Making a DIY Kids KN-95 Style Mask
In a pinch, if you’re a tinkerer or artsy individual with a craft iron (or for $26 on Amazon), it is possible to take a certified KN95 mask and make one that will fit a child’s face. You’re always better off getting something professionally manufactured and tested to an industrial standard. But in a pinch, here’s a guide to making one from a previously tested adult mask.

Finished kid sized KN95-style mask (outside).
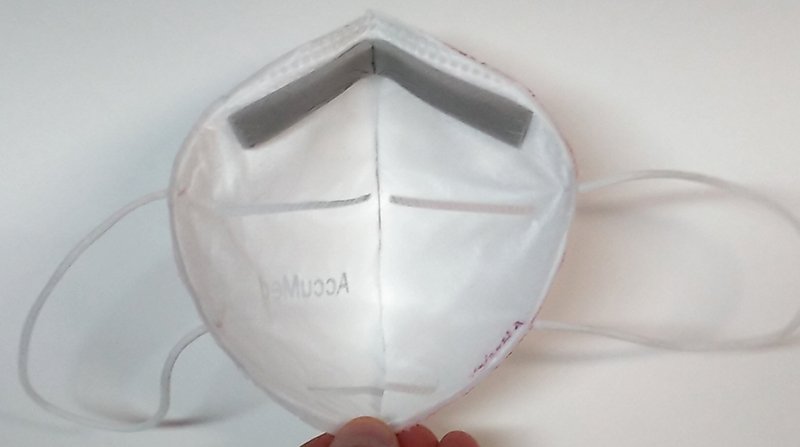
Finished kid sized KN95-style mask (inside).
With the Omicron variant of the Coronavirus, the CDC recommends using N95 or KN95 masks (CDC Jan. 14, 2021 update). These masks have 95% filtration efficiency and must meet specific industrial standards. Child sized masks with 95% filtration efficiency are available by a few new manufacturers, but there are less options and they are not N95 or KN95 masks. They are generally less regulated than adult masks, since there are currently no official standards for child masks equivalent to an N95/KN95.
If you’re in a situation where you don’t have access to the above mentioned child sized masks, or prefer to convert an industrially regulated mask into a child sized one, it is possible to make your own. A good mask is made of correct filtration material and has a good seal. While an industrially regulated mask will have they correct filtration material, generating the correct fit will come down to your skills in making and tweaking the mask to fit your customer (kid).
The process below describes how you can modify a KN95 to make a kid sized mask (at your own risk).
Some background:
N95 masks are NIOSH certified industrial masks for adults which filter out 95% of 0.3 micron and larger particles per NIOSH-42C FR84. They are tested for both filtration efficiency, differential pressure (force required to breathe through it), and leakage rate. All N95 masks have 2 elastic headbands, which provide the necessary fit. Since NIOSH regulates industrial safety, they do not certify child sized masks, so there are no certified N95 kids masks. Anything that claims to be N95 and kids is counterfeit by definition. There are occasionally small adult sized N95 masks (such as the 3M 8210S), but these aren’t typically small enough for children, and fit is just as important as filtration. (For disclosure, I am a tiny adult who wears 3M 8210S masks, and can’t wear standard 3M 8210 masks). If you were required to wear an N95 mask in an industrial setting (or medial), you would likely be required to do a fit test with your assigned mask to ensure that it does not leak and is properly sized.
A KN95 mask meets a Chinese standard for 95% filtration of larger than 0.3 micron particles per GB2626-20 06, and typically has ear loops, instead of 2 headbands. These are tested to that standard. There is some debate about whether all companies producing KN95 masks are completing testing per the standard. Counterfeit KN95 masks are common, and any supplier for N95 or KN95 masks should be checked against the FDA’s approved and rejected supplier list.
For comparison of different types of masks and their test standards, see this link for a helpful table.
Make your own kids mask:
DISCLAIMER:
User accepts all personal risks associated with making or using this product.
This mask is not designed or intended to prevent, mitigate, treat, diagnose or cure any disease or health condition, including COVID-19/Coronavirus.
This mask is not intended to serve a medical or industrial purpose, and is for personal use only.
The mask described here is not tested nor is any guarantee made that it will meet any standards for N95, KN95, or any other safety standards pertaining to kids.
Do not put a mask on a child under 2 years old, because of the risk of suffocation.
Sizing:
This pattern is for a mask for an average sized 9 year old. It’s based on the shape of a 3M 8210S N95 (which I wear), but modified to fit more under the chin like a fabric mask would (due to preference from the child I was designing these for). Some tweaking and iteration will be required to get the right fit for your child. The key is getting a leak-free fit with good comfort.
Time to Complete: 1-2 hours (shorter for batches)
Tools & Materials:
Adult KN95 masks from a reputable source (get a pack of 10-20, so you can practice).
3mm or 1/8” round elastic cord “for masks,” such as https://www.amazon.com/dp/B09PDXXGLV
Weather stripping (for windows), vinyl foam ⅜” wide x 3/16” thick, self-stick, or similar such as Frost King V443 https://www.amazon.com/Frost-King-V443-Tape-Closed-Cell-Moderate/dp/B00FQ5A6C6/
Mask template (click here)
Pen or ultra-finepoint sharpie
Wax paper https://www.amazon.com/Reynolds-Cut-Rite-Paper-Sq-Ft-Count/dp/B0036QO8M6/
Scissors
Needle & thread
Ruler (inch & cm)
Small flathead screwdriver or staple remover
A smooth clean wooden surface (workbench, old cutting board, etc) you’re ok getting waxy
(Optional) Double sided permanent scotch tape (optional) https://www.amazon.com/Double-Sided-Dispenser-Permanent-Inches-2-PACK/dp/B0178XLL2W/
(Optional) your preferred industrial double sided film tape such as 3M 969
Notes:
You’ll be fusing plastic with a hobby iron. Please work in a well ventilated area due to the risk of fumes.
When fusing plastic, ALWAYS sandwich the plastic between sheets of wax paper so that you don’t melt the plastic to the iron.
Steps:
1. Print the template at full size (not scaled to page). Compare to a ruler and make sure the printed scale matches. Cut out the template on the black trim-to lines and grey outlines.

Sample template. Download the fullsize here.
2. Remove any staples and ear bands from the KN95 mask without adding extra holes in the mask.

3. Align the template on the still folded KN95 mask by lining up the metal nose band and the bent edge of the node band, marked in blue, with the same points on the mask. Trace the cut line on your mask with a pen or ultra-fine point sharpie. Optionally, you can also mark the fuse line, but it will show on the final product.
4. Cut out the mask, slightly wider than the cut lines. Save the cutoffs for practice and patching holes later.
5. Preheat the hobby iron.
6. On the clean smooth wooden surface, lay out 2 sheets of wax paper and sandwich 1 piece of scrap mask. Try to fuse the layers of the scrap mask together with the iron. When the iron is sufficiently hot, it should be able to fuse the layers together after a few seconds. Peel away the wax paper. If some of the wax paper sticks to the material, this is ok.
7. Sandwich the two aligned mask halves between unused sections of wax paper. Carefully fuse the halves together along the nose side (dashed red line), trying to keep the edge of the fused section just up to the fuse line and not past. You do not need to fuse over parts that are still fused by the original manufacturer. Peel from paper.
8. Flip the mask over and repeat the same seam, to ensure the back layers melted in too.
9. Open the mask up slightly and sandwich one side of the mask. Fuse one of the ear sides of the mask (pink dashed line). Stop ~1 cm from the chin where it gets difficult to reach. The width of the fuse line on this side is less important.
10. Flip the mask over and repeat the seam on the other side of the same seam.
11. Repeat on the other ear side of the mask, both front and back sides of the seam.
12. Work the area by the chin, by gently opening the mask without popping the nose seam, and fusing those sections near the chin. Flip and repeat on back side.
13. Inspect the mask for openings, cracks, and holes, especially in the chin and areas where the mask came pre-fused and thinner.
If you see a seam crack, fuse it again.
If you see a hole, cut a small patch out of mask scrap, ensuring you have all the layers, and in the correct order. Place the patch over the hole. Sandwich, and fuse. It’s ok to have extra patch material extend outside of the mask when you do this, because it will be trimmed off in the end.
If a hole or crack cannot be patched in a way that leaves it flexible enough to be worn without breaking, scrap the mask and start over.
14. Trim the mask to the cut lines. If you end up with areas that are not fused, re-fuse those edges so there are no leak paths.
15. Cut 2 lengths of elastic cord to 18cm.
16. Overlay the template over the mask. With a pen, poke through the paper and mark the location of the ear loop connection points (green circles) on the left and right sides of the mask.
17. Sew the elastic cord to the mask at those locations, making sure to go through the cord, and around it so that it’s fully captured. It’s ok to sew through the mask, but you want to minimize holes.
18. Cut a piece of foam weather stripping that is approximately as long as the nose wire. Remove the paper backing and adhere it to the inside of the mask, behind the nose wire. This provides a seal at the nose so air doesn’t blow up into your eyes (foam is present in 3M 8210 masks). If the adhesive on the foam does not stick well, you can reinforce the adhesive using PERMANENT double sided scotch tape, or similar strong film tape (eg 3M 969).

Fitting:
Ask (or bribe) your test customer to wear the mask and give you specific feedback. You may need to pre-form the nose wire on an adult before fitting so that it starts with the right curvature, before you try to squish it to their face. (Pick a good time of day so the feedback is useful).
Can they breathe through it comfortably?
Check that the ear loops are comfortable and not loose or too tight. These can be adjusted/replaced easily.
Confirm that the nose does not leak air.
Confirm that the chin fits properly, and there’s no significant leak during breathing or talking. There won’t be enough room for full open jaw singing in this mask. Note that there is always some leak in a mask, but the goal is to minimize it. You will likely need to change some of the shape of the chin to achieve a proper fit.
Check if the mask above the nose wire is getting into the eyes. If so, trim the mask above the nose wire, making sure to leave some of the manufacturer’s existing fused edge.
Does the mask survive being flexed, opened/closed, and shoved in a backpack? Test this out before use in the real world.
The finished mask will look like this.

FAQ
Q: I got something melted to my iron. How do I get it off?
A: Plastic debris on the iron can sometimes be scraped off (while hot) with a piece of scrap wood or other high temperature material. Do not sand the iron.
Q: What if the iron melts right through the plastic?
A: Your iron is too hot. Reduce the temperature (if you have the option) or reduce the time you apply the iron.
Q: Can I use a household iron?
A: If you’re really skilled, it’s possible, though I haven’t tried. You’ll need to experiment with the correct temperature and time. Do not use steam.